
My contribution to this Pin
Cushion Blog hop, is this cute
pin cushion with a hole in the middle. Why a hole? This way you can hang it
anywhere you like! On your sewing machine or doorknob, or even on a tree branch
outside. ;)
.JPG)
Or you can pin it on a pin cushion holder
like I did. :) This rosewood pin cushion base was given to me on my birthday
and so I had to make a beautiful pin cushion that would fit perfectly on it.
That's why I made
my first purple pin cushion with embroidery, as a little extra at the Tammy
bag blog hop.


But as you can never have enough of these
pin cushions, I decided to make a few more. Because really, you can use them
anywhere. Now I can have one in my sewing room, one in the living room, one for
on the road..
And you can make it as big or small as you
want to!
The tutorial is very short and the pin
cushion is very easy to make.
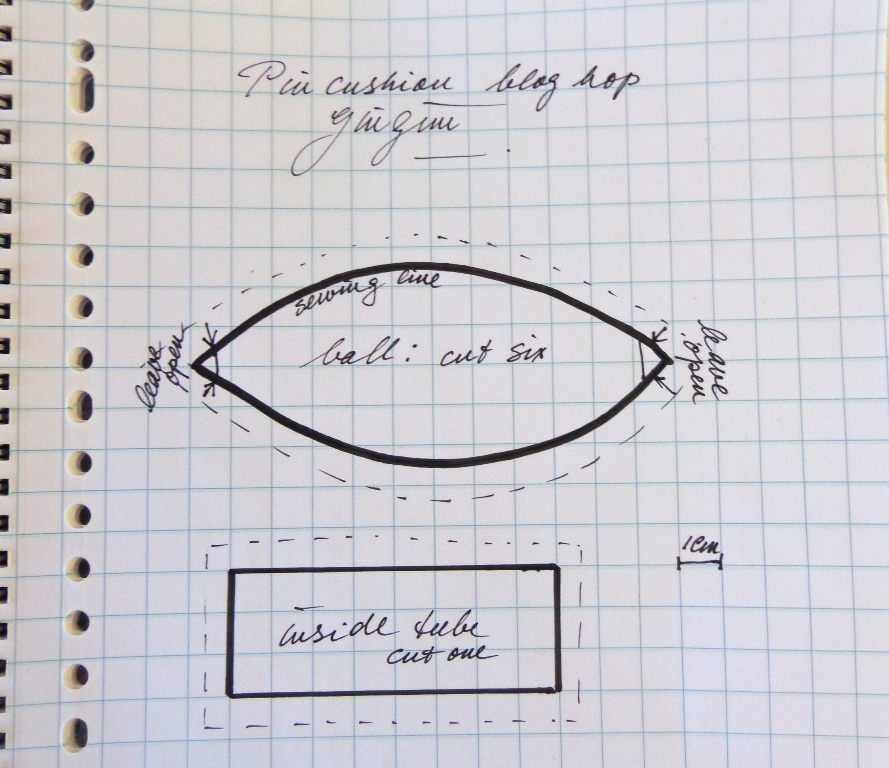
Just make a ball, any pattern will do. But
add a little piece of fabric for a tube inside the ball. This tube must be
shorter than the height of the pattern pieces.
The other important change: Leave a little opening at the top and at the bottom. That's where the tube has to be sewn in.
.JPG)
.JPG)
.JPG)
.JPG)
As you can see, I have made two examples.
One by hand and one by machine. You can choose on how to make it.
The tricky part is sewing the tube in it's
place. That has to be done by hand. With a pencil in the tube, it's easier to
see where to sew it together!
.JPG)
If you want to follow a pattern for this specific pin cushion, check out my drawings and cut six pieces of the orange peel like shape and one tube for the inside.
.JPG)
.JPG)
Fill it up, still with the pencil in the tube and close the gap. Finished!
.JPG)
.JPG)
Use a safety pin
to easily get the rope through!
I used this beautiful Moda fabric because I love
looking at it, but naturally you can also embellish your pin cushion any way
you want!
.JPG)
The other pin cushion I have made for the blog hop, was made in a beautiful heartshaped tin I had in my collection for years. I never knew what
to do with it untill this bloghop came around!
.JPG)
As you can see, the little tin is big
enough for the pin cushion in the lid and some of the most essential sewing stuff. This tin is
very precious to me and this way I have a smile on my face every time I use it.
:)
.JPG)
.JPG)
.JPG)
The base of this pin cushion was an old
embroidery I once made. And the bottom is made from a piece of crazy patchwork that was just lying around. I've glued it together with my glue gun and now the tin is
perfect for my everyday use!
Thanks Mdm
Samm from Sew we quilt and Kristen
from Meadowbrook for
letting me participate in this fun blog hop!
Visit the other Pin it blog hoppers today!
September 10
Gingini that's me!
98 opmerkingen:
Super leuk en creatief Gina! Het appeltje is leuk zowel op z'n standaardje als zonder. en dat blikje is ook wel super schattig geworden (verrassend kleurtje voor jou!)
Fantastisch ontwerp en geweldige uitleg; mooi, duidelijk en handig!!
Het hart in een doosje is een schatje.
Groetjes,
Jeanneke.
Your pincushion apple is sew cute and I love love the pincushion tin. Thank you for sharing your creativity and being part of this blog hop.
So so pretty x
Wow! Dat steeltje wat boven die appel uitkomt, helemaal perfect! Maar je hartje heeft mijn hart gestolen ;) Wat een schatje is dat. Koesteren!
Your pincushion is fabulous and thanks for the great tutorial - I love the tin also and how lovely that you can use it daily and it makes you happy - that's what crafting/sewing is all about!
Great job. Such a beautiful and unique pin cushion.
I have never seen a pin cushion holder before... I have to google that! Love your pincushions!
Hmmm, a pin cushion holder? Never seen one but it has my interest now. Great tutorial. I especially love how you hung them like ornaments. At Christmas, I love to decorate my dining room ceiling with hanging paper snowflakes, now I also have a really cool idea for my sewing room! Thanks for the inspiration.
Wow so great. Thanks for sharing the tutorial.
Wat een leukerds zeg. En reuze handig ook. Wat fijn dat je deelt hoe ze gemaakt zijn. Groetjes Frederika
Your pincushions are lovely - you are brave to sew those curves, but the result is beautiful. But the little heart tin turned cushion is my favorite - very clever!
Love the Rosewood pincushion holder !!
What a great idea!
Wonderful pincushions and thanks for the tutorial on how it was made , the heart shaped pincushion looks sweet in the special tin . Thanks for sharing.
Mooi!!! Leuk ontwerp ook.
great tutorial!! love your pin cushions
fun idea and thanks for the tutorial.
Smart ideas and wonderful pincushions!
Great pincushions! Thanks so much for the tuto. And I love the one in the heart very much!
I love them all. Thanks for the tutorial. I love the heart! Thanks for sharing.
ohhh how lovely...and the idea of the piece of wood...terrific my dear
I am always discovering new "old" sewing objects. What a great idea for the handle, and it is beautiful. Also great idea to use the little tin, and the stitchery and crazy quilt in the bottom are gorgeous.
Ook ik heb nog nooit gehoord van een pincushion holder en dan nogwel zo' mooie houten. Je hebt er weer veel werk van gemaakt met een mooie uitleg en een prachtig resultaat. ik ga er eens lekker voor zitten en de anderen bezoeken......
Thanks for sharing your fun pincushions.
That is very cute. You did such a nice job on it too.
Fabulous!
Thank you for sharing!
What wonderful pincushions. That heart is just amazing! :)
I've never seen a pincushion holder like that before! Love your cushions :)
Interesting pincushion holder...I've never seen one of those before. I love the hole in the center idea and that tin looks beautiful with your pincushion. Thanks for sharing your lovely pincushions!
Your ideas are beautiful and smart! I love how use your heart and keep the memories close by you!
Susie
thank you for sharing. Your idea has inspired me to make a pinchusion out of one of my treasures.
Wat mooi! Ik had nog nooit een speldenkussenhouder gezien! Dank je voor de tutorial, moet ik maar eens gaan proberen (wij speldenkussenverslaafden moeten iets, tenslotte!). Ik vind het blikje helemaal geweldig. Geen wonder dat het een speciaal plaatsje in je hart heeft! Super gedaan!
What precious pincushions, thanks for sharing!
What a neat pi cushion ! I have never heard of a pi cushion base, it's very pretty wood. Great job you did on all !
these are SEW nice! great job
I like your pin cushions, love the idea of storing sewing supplies in the cushion base.
Great ideas for pincushions.Love the ball.Thank you for sharing.
Gina, je hebt jezelf weer eens overtroffen. Prachtige pincushions, zowel de hangende, de staande als het doosje. En mét tutorial, dankjewel!!
Great pin cushion projects.
What a great idea! I love that you can hang the pin cushion or put it on a base. I also love the little heart tin. How sweet!
Super cute!!!
Great pincushion!
Neat idea. Hanging pin cushion. They turned out really cute.
Lovely! Thanks for the "how to". Great pictures.
Both of your pincushions are so clever and pretty - so glad you are blog hopping today!
Love your cute 'hanging' pin cushions..thanks for sharing!
Lovely pin cushions! Thank you for sharing.
I've never seen that wooden pin cushion base before, very clever. Thanks for sharing the tutorial with us. Also love the heart sewing kit. well done all the way around
Great job!
I also have never seen a base like that before:)
Lovely pin cushions! :)
They are quite lovely. I have never seen anything like that before.
I have never seen or heard of a pincushion holder, it looks very interesting though..and I love your pincushions also, Very pretty!!
Cute pincushion and a tutorial, too. What fun!
Oh so cute. Thanks for the tutorial.
Lovely and so portable. Thanks for sharing your creations!
Oh my, you made real Gingini pin cushions, always original and with a great tutorial for the interested! You are very generous, Gini, and your pin cushions are great!
Nice work, looks great1
Thanks for showing the step you took to make your pin cushions. I enjoyed your post. Nice work.
Very cute pincushions. Thanks for sharing.
Very original ideas. Love them both.
So very clever!! Thanks for sharing your good ideas, and taking the time to do a tutorial. Much appreciated.
Very imaginative! I love them both. :)
Wonderful and very useful pincushions.
Thanks for sharing the tutorial Gingini,
so kind of you ☺
Liebe Grüße
Bente
Oh, I love that little heart tin! It turned out quite beautifully. The balls are very handy. Great job on both.
So cute. I love the tin.
I love both of your pincushions! They are great.
They are both so original! What a wonderful idea to have a pin cushion with a hole in the middle. Thanks for the tutorial!
This is really a great idea. So cute. Thank you for the tutorial too. And I love the repurposed tin and embroidery.
Thank you for sharing with us.
xo jan@sewandsowfarm
I never saw a pin cushion base before. All of your pin cushions are adorable.
Lovely pincushion. And a great idea!
Thanks for sharing.
cheers
maggie
maggiemine42@gmail.com
Thanks for sharing your tutorial and pattern. So special to use a special tin as a pincushion. Cute!
Thanks for sharing!
What amazing pin cushions! Thanks for the great tutorial. I would never have thought to put a casing through the middle. What a great, great idea! I love the stitching you did for the case. I have some stitchings, maybe none that small that I definitely need to use. Maybe I can do something similar with them. Thanks for participating and being a great inspiration.
How innovative to make a pincushion that can be hung. I already have a couple of ideas for places to hang them. Your heart tin is adorable - amazing that the embroidery work fit perfectly and I love the idea to line the inside, too.
Adorable Pin-It's! Everyone is so creative when it comes to pincushions. I plan to make some for Christmas presents.
Pinning Blessings
Gmama Jane
Adorable Pin-It's! Everyone is so creative when it comes to pincushions. I plan to make some for Christmas presents.
Pinning Blessings
Gmama Jane
Adorable Pin-It's! Everyone is so creative when it comes to pincushions. I plan to make some for Christmas presents.
Pinning Blessings
Gmama Jane
How very clever of you to make a hanging pincushion. This is brilliant. Thank you for a very fun hop...
These are lovely pin cushions!
They are all wonderful!
Wat een leuke tutorial Ginni, klaar en duidelijk! Je verwent ons :)
Het zijn prachtige speldenkussens allebei, je hebt er echt wel talent voor!
Grtjes, rita.
Such beautiful work... wonderful pincushions!
Thanks for the tutorial. I have never seen a pincushion base before. It made a great pincushion. The heart cushion is lovely! Beautiful work!
Wonderful pin cushions! Thanks for sharing and the tutorial.
Beautiful pincushions. Thanks for sharing and the tutorial.
Hi Gingini What great pincushions and if they are in Christmas fabric you could hang them on the Christmas tree. I love them. Thanks for the Tutorial. Susie x
Very nice work. I love the tincushion.
What a wonderful use for your heart tin, and a great way to keep something so dear close to you. Thank you for sharing with us!
~Brandy
brandizzle7133 at yahoo dot com
what a great idea to have a tube run through the middle..... I have a thought for a mini onethat I will have to try out sometime.
thanks so much for sharing with us
in stitches
Thanks for the great tutorial!
So clever and cute! Thanks for the pictures on how to make it.
Beautiful! Love how you have done that!
I've never seen a pincushion holder before. That is a great idea.
what a clever idea--the stand is lovely so it would be a shame not to use it for your pincushion. How sweet is your tin version too.
Very clever and practical!
The pincushion holder is great - never saw that before
Hi!!! I love your heart tin pincushion!!! Thanks for the tutorial it makes a very pretty pinnie!!!!
Grappig een speldenkussen wat hangt, dank je wel voor het patroon.
Groetjes,
Marga♥
A great idea - the pincushion with the hole in the middle! And thank you for your tutorial, too! I will have to try this. Oh, nice little tin heart pincushion - perfect!
Een reactie posten
Opmerking: Alleen leden van deze blog kunnen een reactie posten.